What is Aperture? A guide for new photographers.
Have you heard the aperture when learning photography, and wondered what it is?
Or what that has to do with the term F-stop?
And just what the heck depth of field is?!
Then you’re in the perfect place! In this blog post we’re going to go over what Aperture is, what the term F-stop means, plus what depth of field is and how we can use it for creative photos!
Ready? Let’s dive in!
Before we get stuck in to today’s post, I want to let you know about a comprehensive freebie that goes along with it! I’ve created an FREE 8 page guide and cheat sheet on Aperture, shooting in Aperture Priority Mode, along with a cheat sheet that has some suggested “numbers” for you for your Aperture, ISO and Shutter Speed settings, so you’ll have everything you need to learn about Aperture at your fingertips. Go here to grab it!

What is Aperture?
Aperture is ONE element of our exposure triangle (the other two are Shutter Speed and ISO) and all three elements work together to control exposure - in words, how light or how dark our image is.
Aperture is really just a fancy shmancy term for a hole.
Your lens has an aperture - a small hole - that let’s light into your camera. You can actually see the aperture in the image below:

When you change the size of the aperture, all you are doing is changing the size of that hole, making it smaller or larger.
If you have a large aperture (hole), you’ll let lots of light into the camera. When you have a small aperture, you’ll let less light in.
What This Looks Like on Your Camera
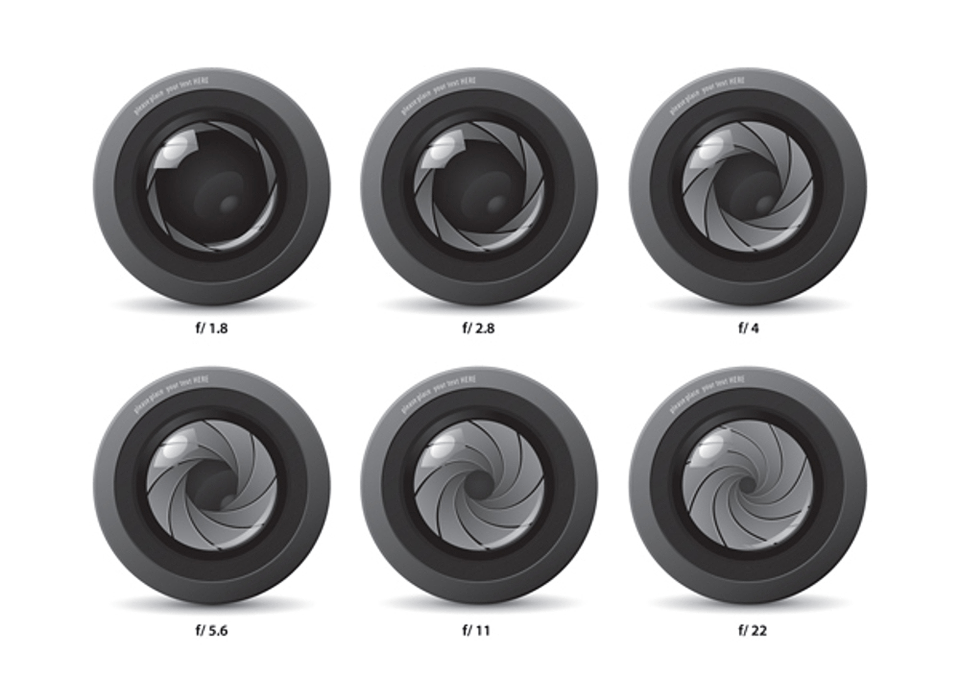
The size of this opening is measured in F-stops, like this:
F1.4
F2.8
F5.6
F11
And you’ll see it written in the same way on your camera, like this:

What’s important to note here is that a larger F number, like F11, F14 or F22 means that you will have a smaller hole, whereas a smaller number, like F1.4, F2.0 or F2.8 will give you a larger opening.
It does seem like it should be the other way round I know, and it will take a few weeks for this to sink in without you even having to think about it, but it will come, I promise 🤞
Have a look at this diagram below to see this visually - you can see that at F2.8 you have a big opening, and that holes gets smaller and smaller as you move your way when you move all the way up to F22, the hole gets smaller and smaller.
So, if we are in a dark room and want to let in more light, we can use a larger aperture.
If we are outside in bright sunlight and want to let in less light, we could use a smaller aperture.
That’s how it works with how much light we allow it to let in to achieve correct exposure. Whilst that is important to remember, Aperture also affects how our final image will LOOK, by controlling depth of field, so that’s what we will turn our attention to now!
How Aperture Changes the Way Our Image Looks
In a nutshell, depth of field is simply how much or how little of the scene is in sharp focus. For example, you can have an image where the entire scene is in focus, like this image below, where you can see that everything in the image, from front to back, is in focus:

Now let’s look at an example of an image that has a shallow depth of field: here you can see that only the subject is in focus, the part in front and behind is blurred and soft.

We can achieve both these “looks” just by controlling our aperture, because when the aperture changes, so does your depth of field!
Let’s say you were using an F stop of F2.8 and you change to F5.6. In addition to letting LESS light into the camera by making the size of the aperture smaller, you are also increasing your depth of field and so MORE of your scene would be in focus.
If you were to change it the other way about, for example move from F5.6 to F2.8, you make the size of the aperture bigger, letting in more light, but at the same time you will be decreasing your depth of field, and have less of the scene in focus.
That sounds a little confusing, I know, but just keep in the back of your mind that the smaller the F number, such as F1.8 or F2.8, the shallower your DOF so the smaller the area in focus will be.
The larger the number, such as F8 or F11, the greater the DOF, so the larger the area in focus.
Try it out!
The best way to learn about Aperture & Depth of field is to try it out, and don’t forget, I’ve created a freebie for you that helps you do just that! This 8 page guide and cheat sheet gives you the information about Aperture & Depth of Field, plus a step by step guide to shooting in Aperture Priority Mode, along with a cheat sheet that has some suggested “numbers” for you for your Aperture setting, and also for ISO and Shutter Speed too. Go grab your Aperture Priority Mode Cheat Sheet now!
That’s it from me for today, and I hope you enjoyed this guide to Aperture. f you liked this tutorial, I’d REALLY be so grateful it if you could share it around. Pin it to your boards on Pinterest, or share on Facebook or Twitter, or just link to the blog in general. Many thanks!