How to Shoot in Manual Mode (+ a manual camera settings cheat sheet!)
I’ve spoken a lot about just how darn important it is to learn how to shoot in manual mode if you want to get great photos, and today I want to teach you how to do that step by step! PLUS I’m going to give you a manual camera settings cheat sheet so you can choose your settings with ease and put it all into practice.
So, grab your camera and get ready to take the first step in taking control of your camera, by learning how to shoot in manual mode!
Before we dig in, let me briefly talk to you about what manual mode actually is.
In a nutshell, Manual mode is simply a mode that lets you manually select which Aperture, Shutter Speed and ISO settings to use.
Each of these settings is incredibly important, because they have two functions - they control how bright our dark your image is (your exposure) along with how your image LOOKS.
In AUTO, or any of the Semi-Automatic modes, the camera balances all or some of these elements for you to determine the best exposure, which of course will change the way our image looks too.
In manual mode, YOU get to decide all three settings to get the best darn exposure for your scene, and so you can get the image to turn out exactly the way that you want it to!
We’re going to cover how to do this right now, but to get the most out of this post, I want you to go here and grab the FREE manual camera settings cheat sheet I have for you. This will help break down some of the “numbers” for you! Go here to grab your free copy.

Got that? Then let’s get started!
Step 1: Set your Aperture
The first element we are going to set is our Aperture by selecting a F number.
Let me break this down a little more for you in case you’re new to what those are!
Aperture is really just a hole in your lens that lets light into your camera, and we determine how big or how small that hole is by choosing an F stop. (You can actually see the aperture get bigger and smaller as we move through the F stops in the image below!)

As you can see, a larger F number, like F16 or F8, will give you a smaller hole, and therefore let less light into the camera.
A smaller F number, like F1.4 or F2.8 will give you a bigger hole, and therefore let MORE light into the camera.
(It does seem like it should be the other way around I know!)
Therefore if we are in a dark room and want to let in more light, we can use a larger aperture. If we are outside in bright sunlight and want to let in less light, we could use a smaller aperture.
So, that’s how it works with how much light we allow it to let in to achieve correct exposure.
Whilst that is important to remember, Aperture also affects how our final image will LOOK, by controlling depth of field, in other words, how much of our scene is in focus. A smaller F number will give you LESS of the scene in focus, whilst a larger F number will give you MORE of the scene in focus. (Want to see some of these different F numbers in practice? Then check out these Aperture Examples!)

Obviously, there is a LOT of factors that go into choosing the right aperture to get the right depth of field, so this is just scratching the surface to get you going!
So for now, just choose an aperture based on what you are photographing (you can get some ideas for what your aperture should be in that Manual Settings Cheat Sheet I mentioned!)
Step 2: Set your Shutter Speed
Next up, we’re going to take control of the second element of our exposure triangle: shutter speed.
If we use a faster shutter speed, we’ll get less light into the camera, as the shutter is opening and closing slowly. If we use a slower shutter speed, we’ll let in more light.
Shutter speed is written as 1/number, so 1/200, or 1/800, or if you’re really slowing it down 1/30. The faster your subject is moving, the faster your shutter needs to be - in other words, you need a bigger number :-)
Again, there is more to choosing a shutter speed than simply how fast your subject is going, but I want to keep it simple for now, so just choose a higher number if your subject is moving about, and a lower number if they are still.
We talk more about shutter speed and the different ways you can use it in this post Movement in Photography, so be sure to check that out if you want some more examples.

Step 3: Set your ISO
Now that we have our Aperture and Shutter Speed where we want to be for what we’re photographing, we can use the ISO as the “balancer”.
In simple terms, ISO is how sensitive your camera is to the light that you just let in via the aperture and shutter. A higher number is more sensitive, and a lower number, less sensitive.
Right now, just choose a ballpark ISO based on the light you’re photographing in - lower light situations will need a higher ISO number, whilst bright sunny days will need a low ISO number. Again, grab that manual mode cheat sheet to help you here.

Step 4: Look at your meter
Now, bring your camera up to your eye and half depress the shutter. See the scale in your viewfinder? It will look a little bit like this if you use Canon….

And this if you use Nikon.

Have a look at the little ticker - is it over on the + side, or the - side?
If your Meter Line is in the Minus Range your photo will (in theory) be under-exposed. You need to let more light into the camera by either:
Choosing a lower aperture number
Increasing your ISO
Lowering your shutter speed.
You’ll need to decide what is the most important setting to keep and which to change!
(I usually like to keep my Aperture and Shutter Speed and move my ISO)
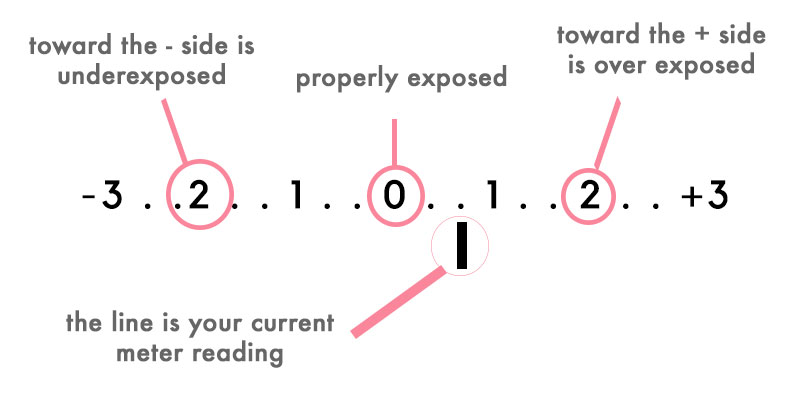
On the other hand if your Meter Line is In the Plus Range your photo will (again, in theory) be over-exposed. You need to let less light into the camera by either:
Choosing a higher aperture number
Increasing your shutter speed
Lowering your ISO.
Keep adjusting one or all three of these elements until you get your ticker to zero!
And there you have it - you’ve just shot your first photo in manual mode!
Now, if you got the impression that this blog post was just scratching the tip of a very large iceberg - it was :-)
There is SO much more to both choosing the right aperture, shutter speed and ISO settings, and to shooting in manual mode itself!
In fact, we have two whole modules devoted to this in my Auto to Awesome course, just to give you an idea of how much more there is to know!
So if you fancy getting a ridiculously in-depth, comprehensive step by step program that will teach you everything there is to know about getting great photos (ie not just shooting in manual mode!) Auto to Awesome will be your new best friend.
Meanwhile, give shooting on manual mode a go, and let me know how you get on! (Don’t forget you can download that manual mode cheat sheet to help you too!)
You can leave a comment below, or post on my Facebook page, or tag @livesnaplove on Instagram! Can’t wait to see what you come up with!