How to Mirror the Background in Photoshop
Learning how to mirror the background in Photoshop is a great way to quickly and easily remove large distractions from an image, and otherwise tidy up the frame and make a neater image. And the best news? It's super quick and easy to do! It's definitely waaay easier than cloning or patching out distractions, so it's another great trick to have in your editing back pocket.
For this post, you have two ways to consume it - you can simply watch the video which will show you how to mirror the background in Photoshop (and in a mere 3 minutes) or scroll down a little further, and you'll see step by step instructions with screenshots. So whichever way you like to learn, I've got you covered 😃
Before we get stuck in, be sure to download my latest freebie, the Ultimate Photoshop Starter Kit. It’s got a little bit of everything to get you going, including guides to layers, levels, saving, plus a little clutch of actions (including my perfect for online sharpen and resize action) GO HERE TO GRAB IT!

Prefer to read instead of my Scottish twang? (really?!) Then this is for you :)
Step One: Duplicate the Background Layer
Open the image you want to work in Photoshop, and start by duplicating the background layer. You can do this by pressing Command + J if you are on a Mac, or Control + J on a PC. Alternatively, click on the background layer and drag into onto the create new layer icon at the bottom of the layers panel.

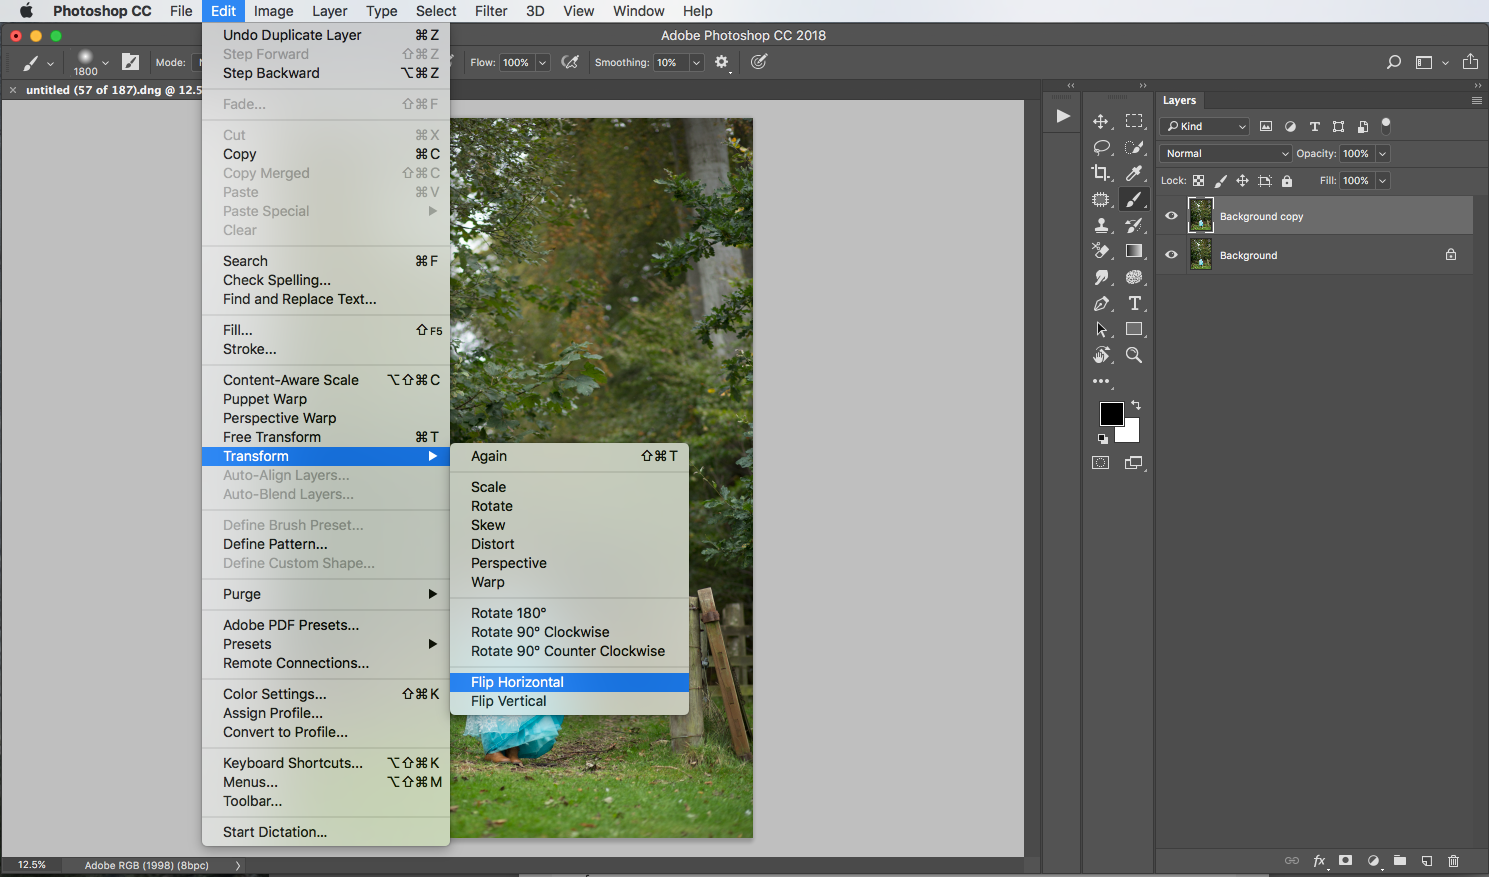
Step Two: Flip the Background Copy
Now we need to flip the background copy you just made, so we have our mirror image to work from.
Go to the top toolbar and click on Edit, then Transform, then Flip Horizontal.
Step Three: Add a layer mask and invert it
Next, make sure you have the copy of the background layer selected, and click on the create new layer mask icon at the bottom of the layers panel. This will create a layer mask, which will allow us to paint on the mirrored background just where we want.

But before we can do that, we need to invert the mask by making we sure have the mask selected (the white box on the layer) and clicking on Command + I if you are using a Mac, or Control + I if you are a PC user. This will turn the mask black like in the image below.

You're image will also look like it has gone back to the original. All that's happened here is that we have hidden the effect, so that we can paint it on only where we want it.
Step Four: Brush on the areas you want the mirrored background to appear.
Select the brush tool from the toolbar, and make sure that the foreground box is white (click on the little arrows next to it to switch between black and white) Now take your mouse over your image, and start painting on the areas where you want the mirror image to show through.

Be sure to try to keep it looking natural - if you paint a bit you wish you hadn't, all you need to do is switch the foreground box back to black, and paint again.
Step Five: Complete!
All you need to do now is flatten the image by going to Layer, then Flatten Image. You can also clear up any other distractions or areas that are too obviously mirrored by using the patch or clone tool.

That's it! You have now successfully mirrored the background in Photoshop :-)
If you haven’t already done it, don’t forget to download my Photoshop Starter Kit and get your Photoshop goodies!