The Exposure Triangle in Photography
So if you'd been wondering what the exposure triangle in photography is, then you're in the perfect place!
Because in this video / blog post I'm going to explain what exposure is, the three elements that control it, and how they all work together in something called the exposure triangle, to help you get perfect photographs!
And as a bonus, I'll be showing you how you can put all this together in practice to take better photos, so be sure to read or watch right to the end :)
As usual, you can choose to watch the video below, or keep scrolling to read a transcript….
Grab your Aperture Priority Mode Cheat Sheet here!

What is Exposure?
So let's start by looking at what exposure actually is.
So just like our eyes, your camera needs light in order to see and record the scene in front of it. If you have too much light coming into the camera, then your image will be overexposed - in other words, it's going to be too light.
If you don't have enough light coming into the camera, then your image is going to be too dark. In other words, underexposed.
So getting correct exposure is nothing more than controlling how much light we let come into the camera and hit the sensor (in other words, how long our camera sensor is exposed to the light) in order to make sure that our image is neither too light nor too dark.
Now when you are shooting in AUTO mode to your camera takes care of this for you, as it does everything for you automatically.
But in order to get better photos and get away from taking images that have that “snapshot” quality to them, we want to learn how to control this so that we can control how the final image looks. And the first step in being able to do that is to understand the different ways that your calmness sensor is exposed to the light….
The Three Elements of Exposure
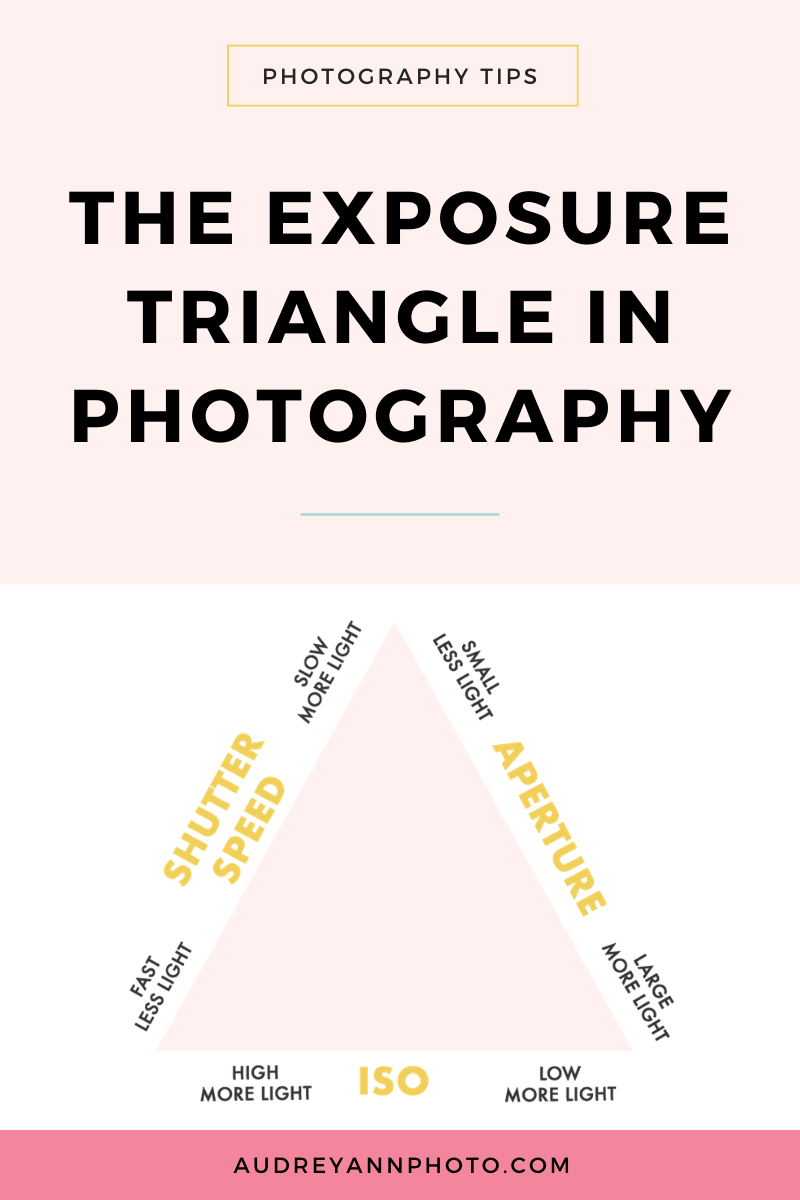
So there are three different elements that help you obtain the correct exposure and they are, in no particular order, Aperture, Shutter Speed and ISO.
Each of these controls how much light is coming into the camera and therefore your exposure. Let's take a look at each of them individually.
APERTURE
Aperture is basically the size of an opening, a hole really, in your lens that lets light into your camera sensor. A large opening allows more light in and a smaller opening, less light. By controlling our Aperture, we are simply controlling the size of that hole.
The size of that hole is controlled by something called the F stop. So you'll see that written in your camera as something like F 2.8, F 5.6 or F13 - or anything in between.

So we basically change our F number in order to change the size of that hole - to make it larger and let more light in, or make it smaller to let in less light.

You can see that in this diagram below - at F16 there at that first image there on the top left you have the smallest hole. And then as we work down through that aperture numbers all the way down to F 1.4 you can see that that size of that hole, in other words the size of the aperture, keeps getting bigger and bigger.
SHUTTER SPEED
So the second element in our exposure triangle is shutter speed.
Shutter speed simply refers to how fast or how slow the shutters in our camera open or close. So the light comes into your camera via the aperture, that hole in your camera lens, and then behind that sits your shutters.

Now just think of shutters as being like curtains over the aperture. So they literally open and close over the aperture hole. If they open and close slowly, then you let lots of light into the camera. If they open and close quickly, then you let less light into the camera. So that's all your shutter speed is, it’s controls the speed of those shutters.
And you'll see this written as a number usually with a one in front of it. So 1/125, 1/500 or 1/3000 for example.
ISO
So the last element in our exposure triangle is something called ISO, and this is your camera's sensitivity to light.
Now it doesn't let light into the camera in the same way that your aperture and your shutter speed does - it controls how sensitive the camera sensor is to the light. So the light is coming in via your aperture, and then being allowed in via your shutter speed (by how fast or how slow that shutters open and close) and then it hits your cameras sensor. tThe ISO is simply how sensitive that sensor is to the light.
So a smaller ISO number is less sensitive to light, and a higher ISO number is more sensitive to light.
Now it doesn't exactly work like this, but I like to think of it this way - you can think of having receptors there on your sensor.

If you had ISO 100 you would have a hundred off those receptors picking up that light. If you had a higher number, let's say ISO 6,400, think of it as having 6,400 sensors on your sensor. So ISO 6400 is picking up more of the light that your camera is getting in through its aperture and it's shutter speed. Now, as I said, it doesn't actually work like that in practice, but it's a useful way of thinking of it.
SO WHAT’S THE EXPOSURE TRIANGLE?
So right now you might be wondering where does this darn triangle that everyone keeps talking about come into it?!
Well, the triangle is simply a way of showing that there's a relationship between all three of these elements, and that they're all actually connected.
When you get the correct exposure, all of these three elements are nicely balanced and you have that stable triangle. If you then went on to change just one of these elements, our perfect triangle would go out of whack and no longer be balanced. To get our triangle back into shape and get our exposure correct again, then we need to change one or both of the other two elements to compensate for the changes we made.

So let me give you a real life example of that. So let's say that you have your aperture, your shutter speed, and your ISO number all set and you have perfect exposure in camera. Then you decide to increase your shutter speed. That is going to let less light into the camera and then all of a sudden you have an underexposed image.
So where this triangle comes in! You can then change either of those two new remaining elements to make up for that lost light. We could either open up our aperture to let in MORE light or we could increase our ISO and therefore our cameras sensitivity to light. So then we have our triangle back in shape!
When in AUTO MODE….
Now when you use auto mode in your camera, your camera is doing all of this for you. It is choosing which aperture to use, which shutter speed to use, which ISO to use, and it is keeping our exposure triangle balanced to maintain a correct exposure.
Now this is wonderful in many ways because that allows absolutely anyone to pick up a camera and take an image, without having any knowledge of these three elements and what they do.

But when you are actually interested in getting good images, you do need to move away from the auto mode in your camera for two reasons.
The first is simply is that your camera cannot see and react to a scene and the way that we can, which means it can't really determine correct exposure correctly all of the time. We need to do that sometimes in order to get the image to look the way we want it to.
And the second reason is because aperture, shutter speed and ISO don't just control how much light is coming into our camera, and therefore our exposure, they're also controlling how our images look as well.
Aperture controls depth of field, in other words, how much or how little of our scene is in focus. If we have, for example, we want a portrait image, we might just want our subject in focus and blur out the background images. On the other hand, we might want a landscape image where we want everything from near to far in focus. So aperture allows us to control that.
Shutter speed also has an effect on our images, by how we capture motion. We can choose r to use a slow shutter speed and therefore show the motion through blurring, or we can choose to use a faster shutter speed and freeze the action instead.
Your ISO is also going to affect how your images look - use a high number and you’ll introduce some grain or noise into your images.

So all three control exposure - in other words, how light or how dark our images are - and they also control how our images look. As a photographer YOU want to take control over all three elements so you can determine the best exposure for the scene, which is not always what your camera thinks it's going to be, AND so you can decide how your image actually is going to LOOK!
Remember, when your camera chooses your settings in AUTO, it doesn't know whether you want to blur out the background, or freeze emotion or anything really!. It just goes for middle of the road settings, hopefully covering as must eventualities as it can. And that means you end up with images that have a kind of middle of the road snapshot quality to them!.
So learning all three elements of the exposure triangle is SO important if you want to learn how to get great photos.
SO WHAT’S NEXT?
I mentioned that the beginning that I was also going to help you with your next step!
So now that we have a basic knowledge of the exposure triangle in photography, our next step is to learn how to control these elements and I recommend that you do this by switching to something called Aperture Priority Mode.
What this is is a semi-automatic mode where you get to control one element of that exposure triangle - in this case aperture - and you are going to leave the camera to do the other two (shutter speed and ISO)
That way you still have that safety net there of the camera choosing the other settings and balancing the exposure, but will you taking control of one element. This will help you see how the exposure triangle works and it will also help you get creative control over how your image looks by blurring out the background or having everything from near to far in focus.
The best news? I have created a guide for you that walks you through the whole process, step by freaking step. Go here to down your Aperture Mode Cheat Sheet.
I hope you enjoyed this guide to the exposure triangle in photography, and if you have any questions or comments, feel free to leave them below !