The Ultimate Guide To Cropping In Lightroom
Cropping in Lightroom is SO important in order to make your images look more polished, more professional, and of course more engaging and dynamic through better composition.
So that is exactly what I'm going to show you in this video!
I'm going to show you how to use the crop tool in Lightroom, and we’re going to talk about aspect ratio, changing orientation and so on, as we go through a really in depth look at the crop tool.
Now, do you make sure that you watch right until the end because I'm also sharing a sneaky little bonus tip for changing the crop overlay so you can get more dynamic composition…..
Sign up for the FREE Lightroom Training!
If you’re tired of fighting with Lightroom to get your images to look like the polished, WOW images you want, then be sure to check out our FREE on demand Lightroom masterclass. I’m spilling behind the scenes secrets from the pros so you’ll know exactly how to use Lightroom to turn your photos from drab to fab, and get more done in less time. Check it out here.

Below is a transcript of the video for those who prefer to read, but for this, I really do recommend watching the video instead - it will make much more sense when you can actually see this in action instead of just reading and seeing screenshots!
So here we are in Lightroom and we're in the develop module and then over to the panel on the right hand side you'll see that you have this panel with different tools on it - that's your local adjustment tools. We want to click this one on the far left and that is your crop tool.

And when you open that, this is where all your options for cropping in Lightroom pop up. So let's just start with the basics as you can see below on the right hand side.
So once you've selected that tool, you'll see that grid comes over your image and you'll get these handles on the corners of your image. So if you move your mouse over the corners, you'll see that that changes and you can actually just click and click and bring that in to crop into your image.

Move your mouse over your image, and it changes to a hand, and you can use that to move that grid around your image until it’s in the perfect location.

Your can also move your mouse to the side, just off one of the edges, and you you'll see that that changes to that a corner, double arrow. You can kind of move that around to straighten out the image aswell.

Now for straightening, we do have another tool that we could use, which is this ruler. So just where these crop tool options are, you'll see that ruler. Just click on it to pick up, take it over your image. On any line in your image you simply need to click and drag that along the line, and then Lightroom will automatically straighten it to that line. (you can do it on a vertical line as well!)

Now if you want to change the orientation, all I need to do is press X on my computer keyboard. So you see that changes our orientation, but everything works in exactly the same way.
Now, the next thing I'm going to talk about is the aspect ratio. So you can see that when I move this, it stays to the same aspect ratio. It doesn't matter how much I pull it in or out. It's sticking to that aspect ratio. Now aspect ratio is the length by the height. So it's always keeping that same length by the height.
It doesn't matter if I crop in quite small, it still has that same ratio between the length and the height. Now as standard, your camera is probably going to be four by three, but you can change the aspect ratio here. So where it says aspect and then original does click there and then you can choose any one of these options. So for example, if I wanted a four by five, which is a kind of classic eight by 10, I could click on that and you'll see that that changes the aspect grid over my image.
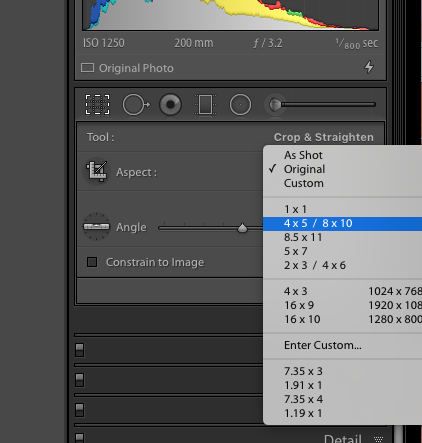
Now you can also choose a custom size, so again, just click there and you can go down to where it says enter custom. Just click on that and then you can put in your custom aspect ratio here but you're not going to want to do that too often. But maybe for things like when you're preparing your photo for Instagram or Facebook, you might want to change to accustom aspect ratio.
We also have this lock icon here. If we click on that, that will unlock and what that means is that I can pretty much do anything I like with regard to the size. Um, now I don't recommend that you do that generally because if you send this sort of an custom unconstrained cropped image to your printers, they're going to print into one of their predetermined aspect ratios like four by three or eight by 10 or whatever they happen to print to.

Once you've finished cropping you just need to go down here and press done at the bottom right there, or you can just press enter on your computer keyboard.

Now obviously there is a lot more you are going to want to do to your image rather than just cropping. And I do have a FREE Lightroom video training, which is about an hour long and goes into SO many editing tricks and tips! You’re definitely going to want to watch that so sign up here and you’ll be watching the free training immediately!