
10 Camera Settings You Should Change Today
Have you recently bagged yourself a new DSLR? Here are 10 camera settings that you should look to change or check before you start shooting!
#1 – Turn Off Your Flash
First things first, turn that flash off! Flash does absolutely nothing for your subjects – the light produced from a flash is hard and unforgiving, and your subjects will end up with red-eye and washed out faces. Instead of using flash, move your subjects closer to a light source instead – get them closer to the window, or open up the blinds to let more light into the room. If you are shooting with indoor lights, turn on another lamp!
#2 - Check Image Size and Quality
Before you take any images, take a moment to check the image size and quality that your camera is set to. Personally I recommend shooting in RAW – this gives you the most control over the look of your final image. However, if you don’t feel quite ready for that yet, make sure that you have the highest quality setting selected for your JPEG images – this helps if you need to crop in (therefore losing some pixels) and means that you always have a file size that will allow you to print to any size.

#3 - "Tune in" Your Diopter
If you look through the viewfinder and the scene looks blurry (even though you are getting the green light and the confirmation beep that you have achieved focus) then your diopter has probably been knocked out of place. Just turn the dial until everything comes back into focus. Even if everything seems OK, give this dial a twirl - sometimes you see things come into sharper focus than you thought was possible! (Just to be clear - this fixes your viewfinder's sharpness only!)

#4 - Change Exposure Mode to Aperture Priority
I nearly always shoot in Manual Mode, since that gives you the best results, and I urge you to make the change to Manual! However, to start with, try Aperture Priority Mode instead. In this mode, you only need to change the Aperture value, and your camera will help you along by balancing your overall exposure for you. Using a smaller F number for your aperture setting will help throw your background out of focus.
#5 – Make Sure Your Lens Is Set to AF
There is a switch on your lens that allows you to toggle between Manual Focus and Auto Focus. Unless you want to get focus by manually moving the focus ring, make sure your lens is et to AF. (And if you suddenly discover that you are not longer getting auto focus, check this hasn’t been knocked off)
#6 – Customise Your Image Review
You can customise your image review - in other words the picture your camera shows on the LCD after you've taken in. I prefer to change this so that the image appears for a longer time than just a second or two - this is so you can review your test image without having to go back into the play menu. Just makes this a smidgen quicker! You might also want to set it so that you can see your histogram or highlight warnings on the review - this makes it easier to check your exposure rather than relying on your eyes! You might also want to adjust the brightness too.
#7 – Set Your Metering Mode
Your camera will probably be set on Evaluative – which actually is a great all rounder. Unless you know what you are doing, I personally would stick to that when just starting out. However, as you progress, I recommend that you switch to SPOT – this gives you a much better control over your exposure! We go into metering for exposure in much more depth in my ecourse Auto to Awesome, so you know exactly what to meter to and why!
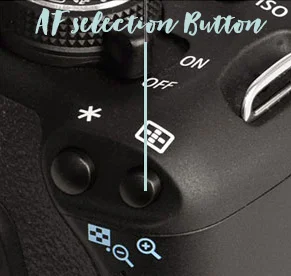
#8– Change From Auto Focus
Using AUTO focus means that your camera will focus on the thing that is closest to the camera. This may very well be your subject, but it can go completely awry and focus on the innocent bystander standing to the side, or get it completely wrong and focus on the background. It can also get it just ever so slightly wrong – for example, if your subject was wearing a hat, it can focus on the hat instead of the face, giving you a slightly out of focus subject. By moving over to Manual Focus, you “toggle” your focus points and choose the one that is closest to your subject.
#9 - Burst Mode
I actually always have my camera on High Speed Continous (also called burst mode – check your camera manual) which allows you to fire off several shots in quick succession. I love it for action shots, and I just find it easier to have it available all the time, instead of having to change it each time. Beware though, don’t keep your finger pressed down on the shutter for too long or you will end up taking loads of shots AND you will probably find that you can’t a shot for a few minutes after, whilst your camera “buffers” the shots you took. You can read more about burst mode here.
#10 - Color Space
This will probably already be set to sRGB, but if not (sometimes these are set to RGB, without the S in front) then change it to sRGB. This means you don’t have to worry about out of gamut colors (!) and soft proofing. Stick with sRGB for now and worry about all that stuff later (if ever)
That's it: Ten changes you can make to your camera to allow you to take better photos today!