5 Steps to Getting Great Photos
It’s so easy to feel overwhelmed when learning photography - let’s face it, there is SO much to learn, and so much information available online that you can sometimes feel like you’re drowning in information.
But the truth is, although there is definitely a lot to learn, if you can focus on just five key areas in photography, you’ll get better photos. And if you are new, they can even be done one after the other, as you want to layer on the knowledge, not take random pot shots from each area and try to fit them together (doesn’t work too well!)
So today’s blog post is what you need to focus on to become a better photographer. Do just these five things, and by the end, you’re photos will look freakin’ amazing, I’m telling you.

Now, before we dive in, I wanted to let you know about an extra special freebie I’ve created just for you! It’s my FREE 90 Day Photography Learning Blueprint, and it’s a complete roadmap for you to follow that shows you exactly what you need learn to get great photos, and has links to further reading in each one. This little PDF is worth its weight in gold, so go grab it now (you’ll kick yourself in about a week if you don’t!)
#1- Move Away from the AUTO Mode
If you only ever take images on AUTO mode, then you would be as well buying a simple point and shoot camera and leaving it there. Your DSLR does not take better photos just because it costs more - the reason you can take better photos with it is because you get more control over your settings. So if you don’t take that control, you won’t get better images!
In time, you definitely want to shoot in manual mode.
Manual mode is when you take control of all THREE elements of exposure (aperture, shutter speed and ISO) and get the right exposure for the scene you are trying to photograph (which may be an entirely different exposure than the one your camera would give you!)
So if you are on AUTO at the moment, take your first steps away from this with Aperture Priority Mode.
If you are already on Aperture Priority mode, then make the switch to manual! I promise, once you truly learn this, you’ll never go back as you’ll see the massive effect this can have on your photos.

#2 - Think Light first, Location Second
Light is the make or break element of your image - more than your camera settings, or your composition, and yes, even your subject!
Even the most bland and boring scenes or subjects can be made to look AMAZING just by your use of light.
There are several ways you can light your subject, but if you are just starting out, then I recommend that you start by learning how to use the light indoors.
Why I hear you ask?
Well, light indoors is MUCH easier to deal with because we’re no longer at the mercy of mother nature, which can be a little bit more challenging!
Here’s what to do:
Find a window indoors that is larger than your subject, and that does not currently have direct sunlight coming through. Place your subject so that they are facing into the light - so you as the photographer have the light at your back. You should see soft, smooth, creamy skin and wonderful catchlights in the eyes.
Now, this light is a bit safe (and dare I say it, boring) so once you have that done, move so that the light is hitting the subject from the side (like in the image below) to get some shadowing to the face, which helps add depth and dimension.
Light itself is a huge, HUGE subject because there are so many variants of it (which is why we have a whole module devoted to it in my Auto to Awesome course) so start make learning light a top priority if you want to get better photos!

#3 - Take control of your OTHER settings
Once you have started taking control of your exposure by shooting in manual mode, and you are learning how to use light more effectively, then you can move onto changing the OTHER settings in your camera.
A big one for this is the settings for your FOCUS.
So many people struggle with getting sharp photos - and it’s easy to see why! There is a LOT of different elements that go into getting a sharp photo, so it’s not a case of throwing some random tips at you and hoping for the best :-)
But a really common one for new photographers is that they’re using too slow a shutter speed for what they are photographing, especially if they are not shooting in manual mode.
Keep this in mind - the minimum shutter speed for handholding a lens is at least 1/60 (sometimes more depending on the lens) and the absolute minimum shutter speed is 1/125 for a person. Did you note that i said MINIMUM? Ideally, you always want to be higher than these minimum speeds, especially if you’re photographing a child (I rarely go under 1/250 for a child, even if they’re still)
#4 Learn Simple Composition Rules
Now that we have our camera settings in place, and we know how to use light, we can start to get super creative with our photos!
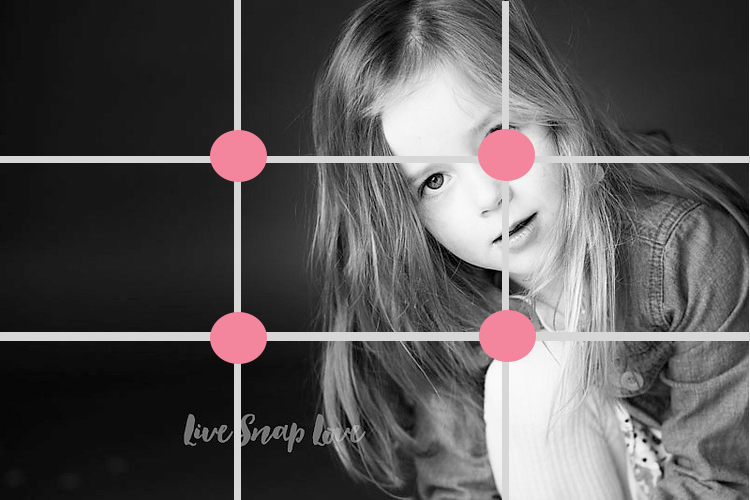
Composition is simply how you arrange the various elements within the frame in order to make your photos more engaging and impactful. You can use the rule of thirds, framing, leading lines (which is what you see below) to draw your viewers eye around the frame or make your images more dynamic.

Again, aiming at those who are new to photography - start with the rule of thirds. It’s the most simple one to use, but it has a big impact.
Simply imagine that your photograph is divided into nine equal sections by two horizontal and two vertical lines like the image below.
Our eyes are naturally drawn to the points where these four lines intersect (where those little pink circles are) Placing a point of interest on one of these intersections, or simply placing elements along one of the lines, gives the photo more balance and make it more appealing to the viewer!
#5 - Practice, Practice, Practice….then practice some more
Learning to walk into a location and immediately find the light is something that will definitely take some time, and practice. You can start today by grabbing a willing subject and heading outdoors. Where’s the light coming from? Where is it landing? What are the shadows falling? Are there catchlights in the eyes?
Have your subject stand in one spot, but turn in a circle. Take photos from all different angles and then examine your results.
Learn manual mode, and practice a little each day to build in muscle memory. Start changing the settings on your camera, and trying out new composition tips and tricks.

If you picked up a handy hint or two in this tutorial, or it just lit a fire in your belly for learning photography, I’d REALLY appreciate it if you could share it around. Pin it to your boards on Pinterest, or share on Facebook or Twitter, or just tell your friends about the blog!
Don’t forget to download your FREE 90 Day Photography Learning Blueprint before you go too: there is so much goodness in this little PDF that you’ll definitely want this with you on your photography journey. Grab it here: