
Do These 10 Things When You Get A New Camera!
Did you just snag yourself a brand shiny new DSLR camera, or get one in the January sales? Or maybe you’ve just blown the layer of dust off the one that’s been sitting in a cupboard since last year?!
However and whenever you got your hands on your new camera, it’s an exciting time, regardless of whether it’s your first camera or your third!
But of course, ANY new equipment can take a bit of getting used to, and if it’s your first camera ever, it can all be a little bit overwhelming too :)
This post lays out 10 things you should do when you get your camera. Obviously, if this is not your first ever camera, some of these suggestions will be a bit basic for you, but it can act as a checklist to make sure you’ve covered everything. And if this is your first one, this post will be a goldmine of information for you :)

Now, before we dive in, I wanted to let you know about an extra special freebie I’ve created just for you! It’s my FREE 90 Day Photography Learning Blueprint, and it’s a complete roadmap for you to follow that shows you exactly what you need learn to get great photos, and has links to further reading in each one. This little PDF is worth its weight in gold, so go grab it now (you’ll kick yourself in about a week if you don’t!)
1. Save The Box!
Once you have your new camera out of it’s box, the first thing you will want to do is store that box safely away somewhere! Both your camera and any lenses will have pretty decent resale values, and it can be easier to sell if you have the original packaging. So keep any boxes, guarantees, user manuals safe and sound.
2. Insert & Attach The “Extras”
Your camera will most likely have come with a charger, a battery and perhaps a lens, but there will also be a couple of things you’ll need that WON’T have come with the camera, such as a memory card, or a strap. Get all of these things attached or inserted to your camera so it’s ready to go!
Get your battery FULLY charged, and then pop that into your camera. This should only be able to go in one way, so don’t force it if it doesn’t seem to go in on the first go!
You’ll also need to insert your memory card, which again, will only be able to go in one way.
Clip or thread on your camera strap so you can wear it around your neck or body (depending on what type of strap you have)
If you have one, attach your battery grip.
Line up the dots to attach the lens that came as a bundle with your camera, or if you got the camera body only, the lens you purchased to go with it.
Check that the switch on your lens is set to AF, not MF, or you’ll spend an hour crying that your camera isn’t working (Done that SEVERAL times)

If you are new to photography, I’d recommend getting yourself a spare memory card, a white balance tool, a spare battery and a lens cleaning cloth. You’ll thank me for all 4 at some point, I promise. You can read more about which memory card and which white balance tool to buy in this post “4 Photography Tools That Will Make Your Life Easier”.
3. Skim Through The Manual
The manual for your camera will not teach you photography (don’t even attempt it!) but it WILL teach you where all your buttons, dials and menu options are. That way when someone (like me) tells you to change from automatic focus point selection to manual focus point selection, or something equally head scratching, you know where to find it.
It’s worth a couple of hours of your time just simply finding your way around your camera - if you are new to photography, even just finding out what the dials on the top of your camera does will be a start!
You should also try to find your way around your lens - I have a really helpful blog post for you here too, Camera Lenses Explained where we go into ALL the functions on your camera lens!

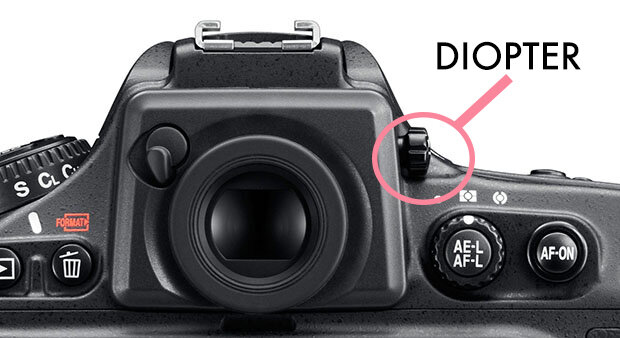
4. Tune In Your Diopter
Have a look through the viewfinder and check that the scene looks sharp, and not slightly soft or blurred. If it doesn’t look sharp, then your diopter has probably been knocked out of place (Not sure what a diopter is? It’s that teeny tiny dial next to your viewfinder). Just turn the dial until everything comes back into focus.
In fact, even if everything seems OK, give this dial a twirl, especially if you wear glasses - sometimes you see things come into sharper focus than you thought was possible! (Just to be clear - this fixes your viewfinder's sharpness only - NOT your image sharpness!)
5. Change Image Review
You can customise how your image looks in preview - in other words the picture your camera shows on the back of the camera after you've taken in. As standard, this only shows for a second or two, whereas I prefer it to show for a longer time, plus you might also want to set it so that you can see your histogram or highlight warnings on the review - this makes it easier to check your exposure rather than relying on your eyes!
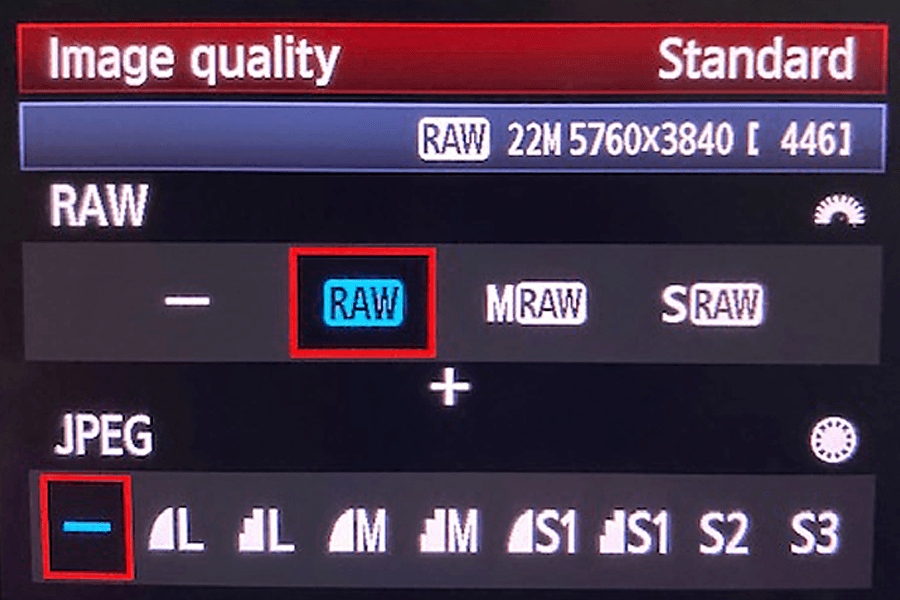
6. Check Image Size and Quality
I’d also recommend taking a moment to check the image size and quality that your camera is set to before you start shooting.
Personally I’d love it if you shot in RAW as this gives you the most control over the look of your final image, but if you are brand new to photograph, don’t worry about that just yet. In which case, make sure that you have the highest quality setting selected for your JPEG images – this helps if you need to crop in aggressively on your pictures, and lose some of those pixels.
7. Check your other settings
If you have been shooting a while, you will have had your old camera set up and customised to be exactly how you wanted it - take some time to go through each menu and match it up as closely as possible to your old camera!
8. Add your camera to your insurance
If your home insurance allows it, add your camera and lenses to your home insurance policy, so that you don’t have to worry about your precious camera being strapped to the back of a monster truck and being driven down the stairs.
9. Find educational resources
Your new camera will come with a lot of wonderful functions, but it doesn’t come with the skill to take great pictures built in - you have to add that little ingredient into the pot! Photography requires you to invest time in learning, and this was the same for EVERYONE who ever picked up a camera.
Which is why the very first thing you should do now is go get yourself some photography education. Whilst there is some fantastic free tutorials available (many of which you’ll find right here in this blog!) nothing free compares to a comprehensive step by step course that will take you all the way from point A to point B in the least of amount of time, and with the least amount of frustration.
Of course, there are literally thousands of places to get your education, and whilst I’m obviously biased toward my step by step courses, I know I’m not for everyone! Find an instructor who you feel comfortable with, who shoots the genre of photos you want to learn how to take (in other words, don’t take instruction from a landscape photographer if you want to be a family photographer) and who has a proven track record for teaching.
If you want a great place to get started, be sure download your FREE 90 Day Photography Learning Blueprint before you go too: there is so much goodness in this little PDF that you’ll definitely want this with you on your photography journey. Grab it here:
10. Get out and shoot!
Now comes the fun part - get out there with your new camera and get shooting!
I hope you found this blog post, and more importantly, the resources we linked to, helpful! As usual, if you have any questions, you can post them below, or come say hi on Instagram and post your question there!


