
5 Simple Ways to Edit Your Photos in Lightroom Classic
Once you switch from shooting in JPEG over to the RAW file format, you will notice that your images look a little flat and dull straight out of camera in comparison to how they used to look!
That's simply because when you shoot in JPEG, your camera applies contrast, saturation and contrast, but the RAW file has none of that applied, which is why you need to add in some "pop" to images yourself! (You can read some more reasons why you should be editing your photos here - read it, then come back!)
So, let's look at some really simply adjustments you can make to give your RAW images a bit of a lift!
#1 - Add Contrast
The easiest way to add some "pop" to your images is simply to add contrast. Contrast is simply when you make the dark areas darker and the light areas lighter!
One way to do this is to use the contrast slider in the Lightroom basic panel , but you can also use the curve tool, which gives you a bit more control over the lights and darks in your image.
A subtle S-Curve like the one below can have a big impact. All you need to do is open up the tone curve, and you will see the graph below. Create an S curve by creating two anchor points, and moving the top one up slightly, and the bottom one down slightly, creating a "s" shape.
An even easier way of doing this is simply to go to the Tone Curve panel and clicking where it says "Point Curve: Linear" then choosing either medium contrast or strong contrast from the drop menu that appears! You could then adjust the anchor points as necessary.

#2 - Fix any lens distortion
if you are shooting with a wide angle lens, in most cases you are going to want to fix any lens distortions.
When you are using a wide angle lens, this is when the middle of the image looks closer to you than the edges, and any lens look curved rather than straight. It's simply because the field of view is wider than the naked eye, so the lens has to distort a little to fit it all in.
You might also get vignetting - when the edges around the frame look darker than the middle.
It's easily fixed though!
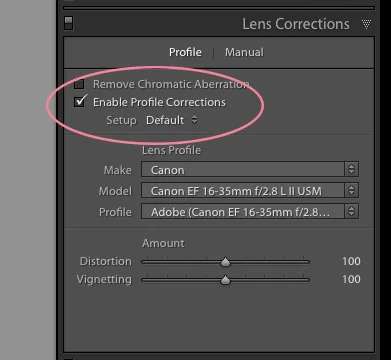
Just head down to the Lens Correction panel and click Enable Profile Corrections. When you do this, Lightroom automatically find the make and model of the lens from your EXIF data, and makes the corrections for you automatically, removing vignetting and distortion in one go.
#3 - Apply Vibrance / Saturation
Both of these sliders beef up the colors in your images, but they work in slightly different ways,
Saturation adds depth to ALL the colours in your image equally, so it can be a great choice for macro of landscape images where you want that all over colour boost.
Vibrance on the other hand, leaves the already heavily saturated colours alone and only adds more oomph to the more muted tones - it’s a more intelligent version of saturation.
For that reason, it can be a much better option to use, especially if there are people in the frame (so they don't start looking like Oompa Loompa!)
Of course you can even use both if that is what the image needs - I tend to use a little saturation, and then more vibrance on top.

#4 - Use the Split Toning Tool
The split toning tool in LIghtroom is a wonderful way to add some interesting colours to your images.
What this does is add a colour tone to the highlights and a colour tone to the shadows.
All you need to do is select the tone you wish to use (blues, oranges, greens or yellows or pretty much whatever takes your fancy!) for the highlights and the shadows.
Then move the saturation for each one until you get a look that you are happy with - you can make the effect a really subtle one just by moving down those saturation sliders so you are only left with a hint of colour.

You can also play with the balance between the highlights and shadows for different effects.
Although I have some tried and tested combinations that we go through in my Edit Like A Pro in Lightroom Classic course, start by just simply playing with it and see what you come up with!
It's a great way to get more creative with your editing.
#5 - Change the Camera Calibration Profile
This is a really quick and dirty way to get your RAW image files looking more like a JPEG in just one click.
Head down to the Camera Calibration tab, and click where it says Profile (this is usually set to Adobe Standard)

You'll see that you get a few options such as Camera Portrait, Camera Standard, Camera Landscape and so on. If you've figured out that these are pretty much the same as the different JPEG settings you get in camera you are right! Pick one (or cycle through them to see what you prefer) for instant pick me up to your image.
You will still probably want to make some of the other changes above, but it can be a good little trick to be aware of, especially if you are pushed for time, or just new to editing in general.
This little tip sheet only scratched the surface of what you can do in Lightroom, so I have something awesome for you - a completely FREE Lightroom Classic Starter Kit where you’ll get a guide to importing, a step by step editing checklist, and an exporting cheat sheet….all for free!