Example Photos With Camera Settings (& Why I chose them!)

Have you ever looked at photos from other photographers and wished that they would share their camera settings as well?
I know that I certainly did, which is why today I'm going to share with you some example, photos, along with the aperture, shutter speed, and ISO settings that I use, but most importantly, why I chose them. (In fact, you might want to go ahead and pin this right now, because I know you’ll want to reference it later!) <
That way you can learn what might be a good starting point for your own photos and see how all of those three elements work together!
Now, huge caveat here. You're not going to be able to take those exact same settings, plug them into your camera and expect the same results. You're going to need to choose your own settings because they will change based on a number of things, not least the amount of light that you have in the scene.
I would also encourage you to choose all three settings yourself in manual mode. It really does make such a huge difference!
If you are unsure of choosing your own settings, then I have a freebie that will help you - our free manual settings cheat sheet - grab it below!
Got that? Great! Then let’s dive in with our first photo:

Photo #1 - Portrait Headshot

This images was taken in my living room in natural light, only just the light from the window.
The aperture here is F4.0 and that's because I wanted focus really to be on the face here.You can see that even his ears and his shoulders and his torso is blurry, and that's because I'm so close to my subject that might depth the field is really narrow.
Ideally, I think I would have wanted to use a slightly smaller aperture to get a larger depth of field, just to make sure that that eye that is behind the camera right eye to be sharper. Ideally. So I think I should have used something like 5.6 here instead, but it's fine the way it is. I still love this image, but just to have both of those eyes, that would have been ideal.
The shutter speed here is one over 1/160 - an ideal shutter speed for a adult who is able to sit still. If this was a child who was moving around a lot more than I would up that shutter speed. And the ISO number here is 1,600. And that needs to be a little bit higher because I'm closing up my aperture a bit just because of my distance from my subject.
The lens used here was a 100mm macro lens, which is actually brilliant for portraits!
Check out this post with Camera Settings for Portraits for more on this :)
Image #2 - Full Body Portrait (outdoor)

This next image is taken outside on a very sunny day. We actually just have a little bit of shade here, but it's full sun this day, so there's a lot of light. Because I wanted to blur out the background. I'm using a larger aperture of F 2.8 and my shutter speed is 1/800.
Now you might think that's a little bit high because she's stationary, but remember that your settings will control how your image looks and also your exposure.
My shutter speed needed to be higher because I'm letting so much light in via my large aperure and it's a sunny day, so there's lots and lots of light going around. So my ISO number perfect for a sunny day is at 100. The lens used here was 135 mm.
Image #3 - Indoor Portrait

The next image is taken using the light from a garage door. If you are struggling for light, open up the door to your garage (if you have one) and pop your subject there, you're going to get fantastic light! It's where I have my little home studio set up :)
So the aperture here is 3.2. Again, I wanted some blur there. You can see, actually, if you look at her legs, we have some blur there in the background, but that was a good aperture to make sure that her hands and her face are in sharp focus.
The shutter speed here is 1/800. And again, you might think that's high for a stationary child, but this wasn't really due to having too much light. This was due to the fact that this child was actually jumping about like nobody's business all over the place!
(You can get more tips for indoor photography settings here too!)
Image #4 - Macro Photo

This image was taken indoors at my kitchen window, so natural light. My aperture here is F 6.3.
When you’re so close to your subject as with macro style images, you really need to make sure you close up your aperture. Now you can see that even at 6.3, I'm getting a lot of blur, which is this case is exactly what I wanted.
If I'd wanted more of this in focus, I would have chosen a smaller aperture by using a larger f-stop (smaller aperture)
Shutter speed is 1/160 and the ISO was 5,000, which is quite high. If I had used a tripod (which I didn't want to use because I couldn't be bothered with digging it out! I could have lowered this,
My shutter speed at 1/160, which I needed to be that high - even though my apple isn't going anywhere - just to counteract the counter shake I could get just by my holding the camera and the lens.
You can find more tips on macro photography settings here.
Image #5 - Blurred Background Still Life

Next image here again, natural light in my living room, just using the window light available.
The aperture used is F 2.8 because I wanted to blur out those lights in the background, so I could get that orbs of light. (Not sure how to blur out the background? Watch or read this post on how to get a blurred background)
My shutter speed is actually a little bit high here at 1/250 and I could have taken this down since I think we can both agree that Mrs Claus here isn't going anywhere! That would have allowed me to use a slightly lower ISO number.
Image #6 - Outdoor Still Life

With this image you can see I'm shooting directly into the light. To blur out the background, I'm using an aperture of F 2.2 and my shutter speed is one over 1/1600. Again, my subject isn't going anywhere, but that's there to balance the exposure because I'm letting so too much light in via my aperture.
ISO is at 160. I could have taken that down to 100 if I was being really careful, but that extra 60 is not going to make the slightest bit of difference, so it's absolutely fine!
Image #7 - Starburst
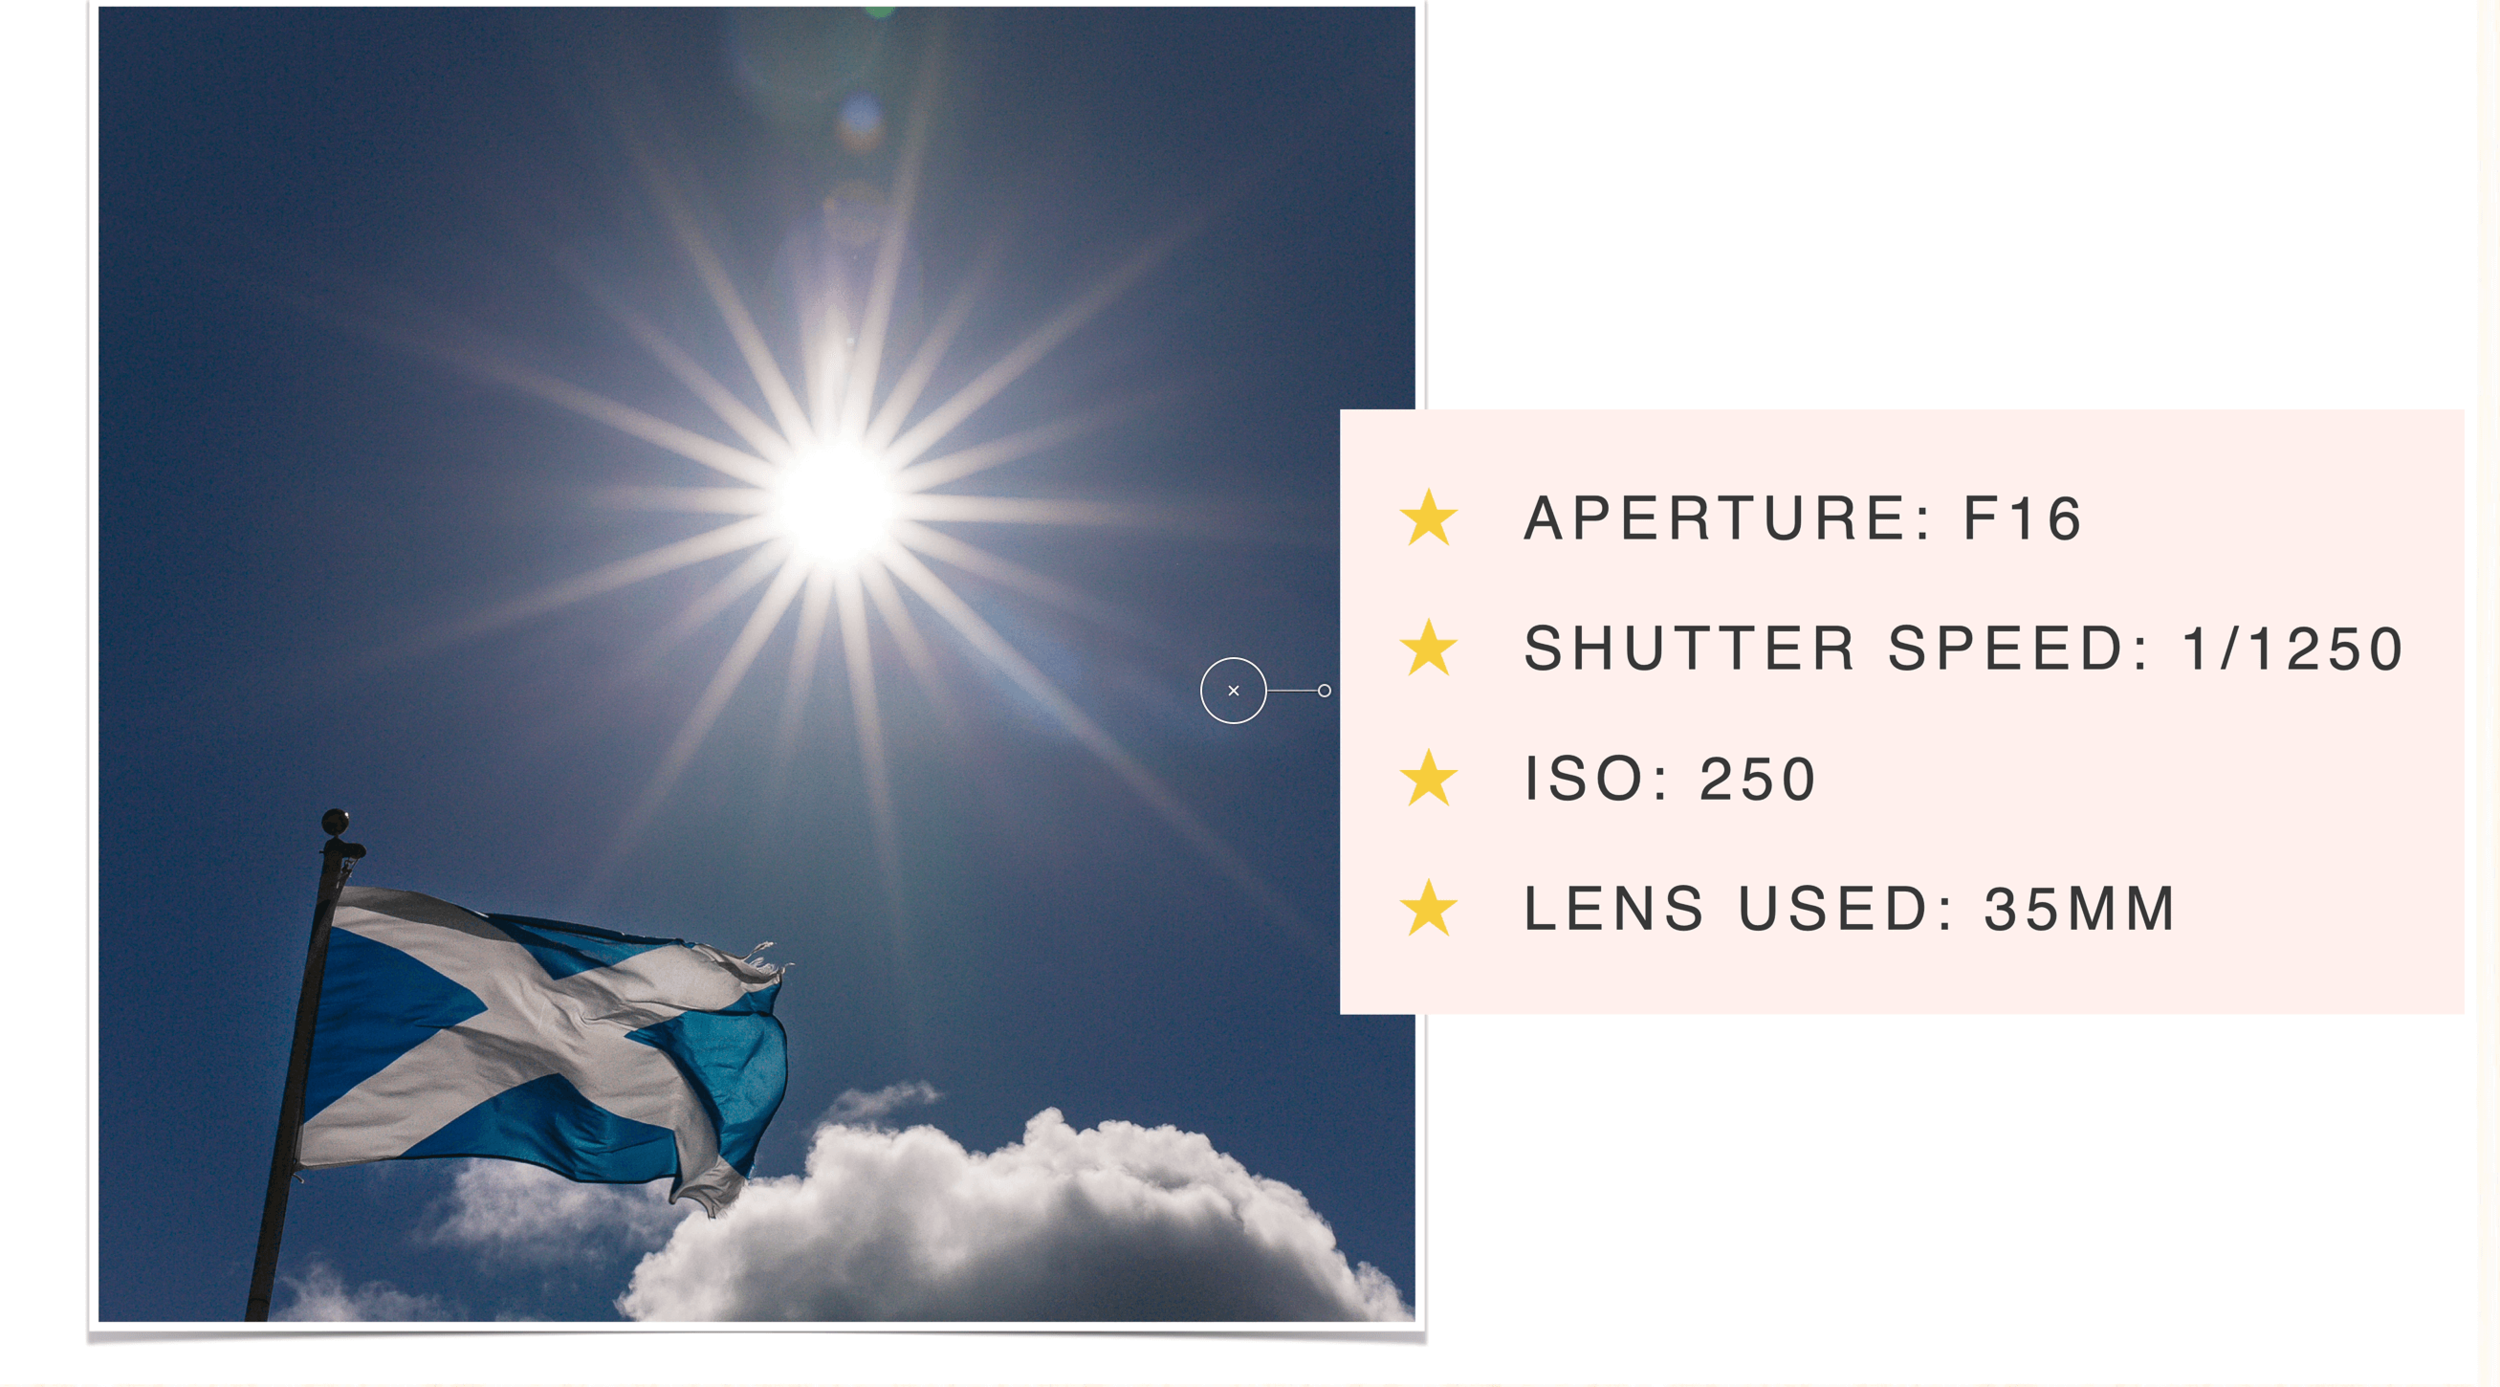
So let's move on to this image here, which is a Starburst or a Sunburst.
The aperture used here is F 16.
If you want that Starburst effect, make sure that you close up your aperture and that will let you give you that effect!
Now the shutter speed here is one over 1/1250 for two reasons: One that flag was moving around a lot because a really windy day, and also because even though I've closed up my aperture, I'm still shooting directly into the sun, so there's a lot of light reaching the camera sensor.
The ISO number here is 250, but this really should be down at about 100. Doesn't make any difference to the final image whatsoever, but it could be down at 100. (That particular day we were actually visiting a castle, so we're going from really, really, really dark rooms out to the sunlight and shaded areas, which was a nightmare for changing your settings!)
Image #8 - Indoor Low Light

Next image is a lifestyle image, taken indoors with no natural light - the only light is from the two lamps either side of my subject, so it's a low light image.
I opened up my aperture to the maximum aperture, which was F 1.4., just to let as much light in as I could in this low light situation.
The shutter speed is 1/200, which I think was perfect for this particular image. Although he's not moving around a lot, there is a bit of movement with the head when they get excited on a video game!
The ISO is 5,000 and it needed to be high, obviously because there's not a lot of light in the room here, even though I'm letting in as much as I can via my aperture.
Now, if you enjoyed this free training and you would like some more help in choosing your camera settings, then be sure to download our free manual settings cheat sheet, where I share with you the aperture, shutter speed and ISO numbers that you might want to use in different situations, so it's a perfect compliment to this tutorial! Click below or go here to grab the free cheat sheet.
So that's it for this week! If you enjoyed it, PLEASE share it - pin it to your Pinterest boards, send a link to your friends, or post on Facebook. Also, leave a comment below letting me know you enjoyed it, so I can make more like it.
Thanks so much for being here and I'll see you again soon.